 Save to Pinterest
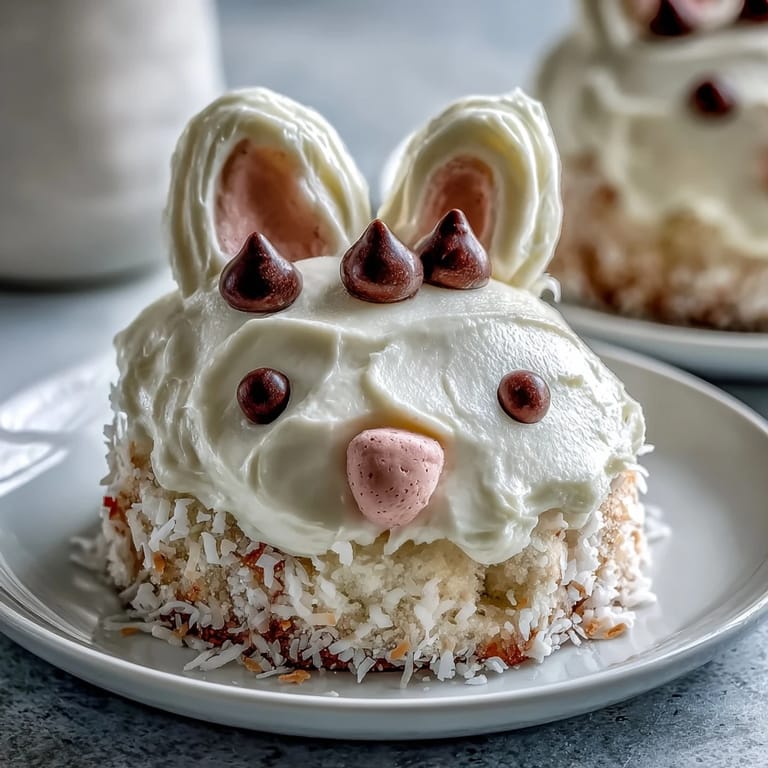
 My daughter came home from school with a crayon drawing of a bunny cake she'd seen in a book, and suddenly I was hunting through my pantry at 8 PM trying to make it happen for Easter weekend. There's something magical about baking something this whimsical—it transforms a regular vanilla cake into pure childhood joy. These mini bunny cakes caught me off guard with how easy they are to pull together, and how the whole kitchen smells like vanilla and butter while little hands wait eagerly to decorate. I've made them three times now, each time a little faster, each time the kids fighting over who gets which bunny.
Last Easter, my neighbor knocked on the door asking if she could borrow eggs, and I ended up inviting her and her twins over to decorate cakes together. Watching four kids of different ages figure out their own bunny designs—one made hers look like a vampire bunny with the chocolate chip teeth positioned just so—reminded me that the best part of baking isn't the final product, it's the mess and laughter that happens along the way.
Ingredients
- All-purpose flour: The backbone that keeps these cakes tender and light; I learned to spoon it into the measuring cup rather than scooping straight from the bag, which prevents packing and makes cakes less dense.
- Granulated sugar: Creaming this with butter until it's pale and fluffy is the secret to a moist crumb; rushing this step makes all the difference.
- Unsalted butter: Room temperature is non-negotiable here; cold butter won't incorporate properly, so I always take mine out of the fridge 30 minutes before baking.
- Eggs: Adding them one at a time prevents the batter from breaking, which sounds fussy but honestly takes an extra 30 seconds and saves your cake.
- Baking powder: Double-check that yours isn't stale; old baking powder won't give you that light, fluffy crumb you're after.
- Vanilla extract: Pure vanilla tastes noticeably better than imitation, and since you only need a teaspoon, it's worth buying the good stuff.
- Powdered sugar: Sift it before mixing into buttercream to avoid lumps that refuse to smooth out no matter how hard you beat.
- Food coloring: Gel or liquid both work, but gel gives brighter colors without making the frosting too wet; I keep a little bottle of each on hand.
- Mini marshmallows: These become bunny ears when cut in half lengthwise; I use kitchen scissors instead of trying to tear them, which keeps them from getting sticky.
- Decorative candies: Pink candy-coated chocolates, white chocolate chips, and mini chocolate chips each serve a purpose; having them sorted into little bowls before decorating makes the process feel organized and fun.
Tired of Takeout? 🥡
Get 10 meals you can make faster than delivery arrives. Seriously.
One email. No spam. Unsubscribe anytime.
Instructions
- Prep your pan and preheat:
- Get your oven heating to 350°F and grease the muffin tin or line it with paper liners; I prefer liners because they peel off cleanly and the kids can carry their own cakes around.
- Cream butter and sugar:
- Beat these together until the mixture looks pale, fluffy, and almost mousse-like—this takes about 3 minutes with an electric mixer and is where air gets incorporated for a light cake. If you're hand-mixing, take your time here; your arm will know when it's right because it'll feel noticeably lighter and fluffier.
- Add eggs and vanilla:
- Drop in one egg, mix until blended, then repeat with the second egg and vanilla—this prevents curdling and keeps your batter silky. You might see the mixture look slightly broken after adding eggs, but don't panic; the flour comes next and brings it all together.
- Combine dry ingredients:
- In a separate bowl, whisk together flour, baking powder, and salt so the baking powder distributes evenly throughout. This step prevents dense pockets in your cakes.
- Alternate wet and dry:
- Add half the flour mixture to the butter mixture, then half the milk, stirring after each addition, then repeat with the remaining flour and milk—stopping just when you don't see streaks of flour keeps the cakes tender. Over-mixing develops gluten and makes cakes tough, so err on the side of under-mixed.
- Fill muffin cups:
- Divide batter evenly so all cakes bake at the same rate; I use a cookie scoop or ice cream scoop to keep portions consistent and fill each cup about two-thirds full. This allows room for rising without overflow.
- Bake until golden:
- Bake for 18 to 20 minutes until a toothpick inserted in the center comes out clean or with just a few moist crumbs. The tops should be pale golden and spring back when gently pressed.
- Cool completely:
- Let cakes cool in the pan for 5 minutes, then turn them out onto a wire rack and wait until they're completely cool before frosting; warm cakes will melt the buttercream and slide off. I do this step an hour or even overnight ahead of time.
- Make buttercream:
- Beat softened butter until it's pale and creamy, then gradually add sifted powdered sugar while mixing to avoid lumps and clouds of sugar dust. Once smooth, add milk and vanilla and beat until fluffy and light.
- Color and frost:
- Divide buttercream into bowls and add a drop or two of food coloring to each, mixing gently; frost each cooled cake with a generous dollop, creating a little mound that gives you space to position bunny features. A spatula or small offset spreader makes this easier than a knife.
- Decorate with personality:
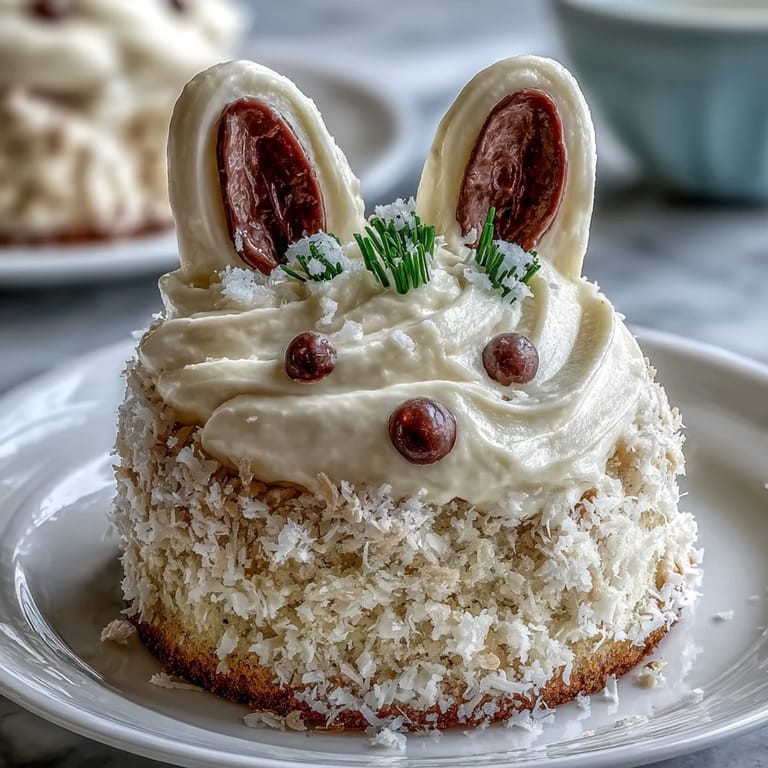
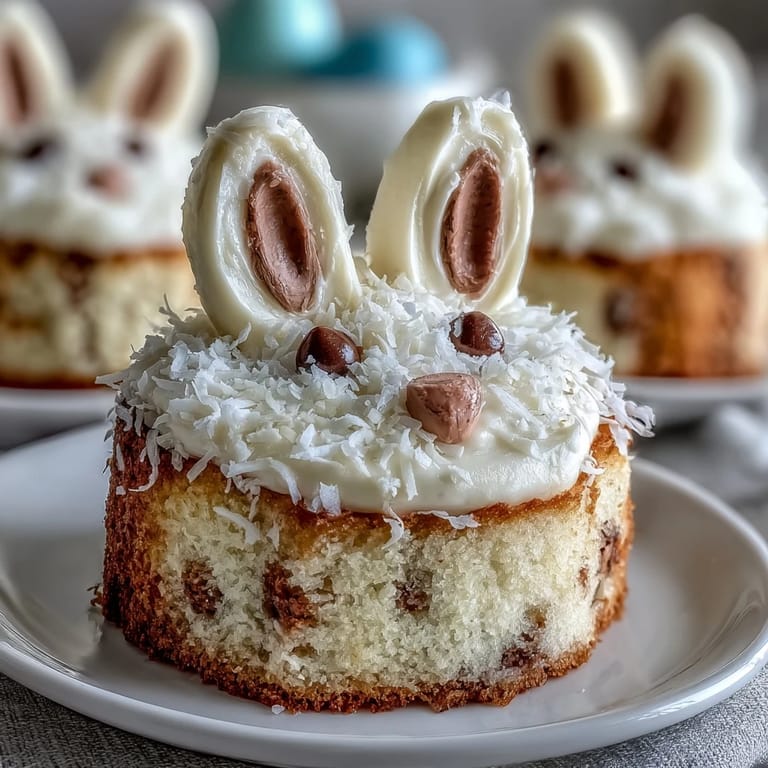
- Cut marshmallows in half lengthwise for ears, press them gently into the frosting at the top of each cake, then position pink candies for the nose and mini chocolate chips for eyes, and add white chocolate chips for teeth if you like. The decorating is where magic happens and where no two bunnies look alike.
- Add finishing touches:
- Sprinkle coconut or green sprinkles around the cakes on the platter to create a little grass scene; this takes thirty seconds but transforms a batch of cupcakes into an entire Easter landscape.
 Save to Pinterest
 There's a moment right before the kids dig in when they're all sitting around the table staring at their own custom bunny cakes, and someone always asks if they can take a picture before eating because suddenly these aren't just desserts—they're creations they made with their own hands. That's when you know this recipe did exactly what it was supposed to do.
Why These Cakes Win Every Time
The vanilla sponge stays remarkably moist for days thanks to the milk in the batter, which means you can bake these a day ahead without any drying out. The buttercream is forgiving enough that you don't need fancy piping skills, but sturdy enough to hold decorations even in a warm kitchen. And the overall recipe is flexible enough that you can swap vanilla for chocolate cake, use dairy-free butter, or let your imagination run wild with decorations—the structure of the recipe stays solid no matter what you customize.
Making This Party-Ready
If you're baking for a crowd, make the cakes and frost them the day before, then do all decorating on the morning of the party; this spreads out the work so you're not stressed an hour before guests arrive. Having all your candies and toppings sorted into small bowls ahead of time makes the final decorating stage feel like an organized craft activity rather than a scramble. You can also prep a platter with coconut or sprinkles already spread out so the cakes are ready to display the moment they're decorated.
Serving and Storage Secrets
These cakes taste best eaten within two days, but the buttercream holds up beautifully for three days if covered loosely with plastic wrap at room temperature. The marshmallow ears might soften slightly over time, but honestly that just makes them squishier and kids don't seem to mind. If you need to store them longer, individual cakes freeze well for up to a month; just thaw them at room temperature before serving.
- Let buttercream soften for 15 minutes if your cakes have been in the fridge before decorating, so the frosting spreads smoothly instead of tearing the cake.
- If decorations keep sliding off the frosting, the room might be too warm—chill the frosted cakes for 10 minutes before adding candy details.
- Keep extra marshmallows and candies on hand because there's always someone who wants to swap ears or change a bunny's expression at the last second.
 Save to Pinterest
 These little cakes turn a regular Easter celebration into something the kids will talk about weeks later. That's the whole point, right?
Common Recipe Questions
- → What type of flour is best for these cakes?
All-purpose flour provides a tender crumb and a balanced texture ideal for these mini cakes.
- → How can I make the buttercream smoother?
Beat the butter until creamy before gradually adding powdered sugar and milk to achieve a fluffy, smooth buttercream.
- → Can these cakes be made dairy-free?
Yes, substituting dairy-free butter and milk works well to accommodate dietary needs without sacrificing taste.
- → What’s the best way to bake evenly in muffin tins?
Fill each cup about two-thirds full and bake at 350°F until a toothpick inserted comes out clean to ensure even cooking.
- → How can kids help decorate these cakes?
Kids can use marshmallows, candies, and sprinkles to create bunny features and festive grass, making decorating fun and interactive.
- → Can the vanilla sponge be replaced with another flavor?
Yes, swapping vanilla for chocolate or other flavors is simple and adds a personal touch to the mini cakes.