 Save to Pinterest
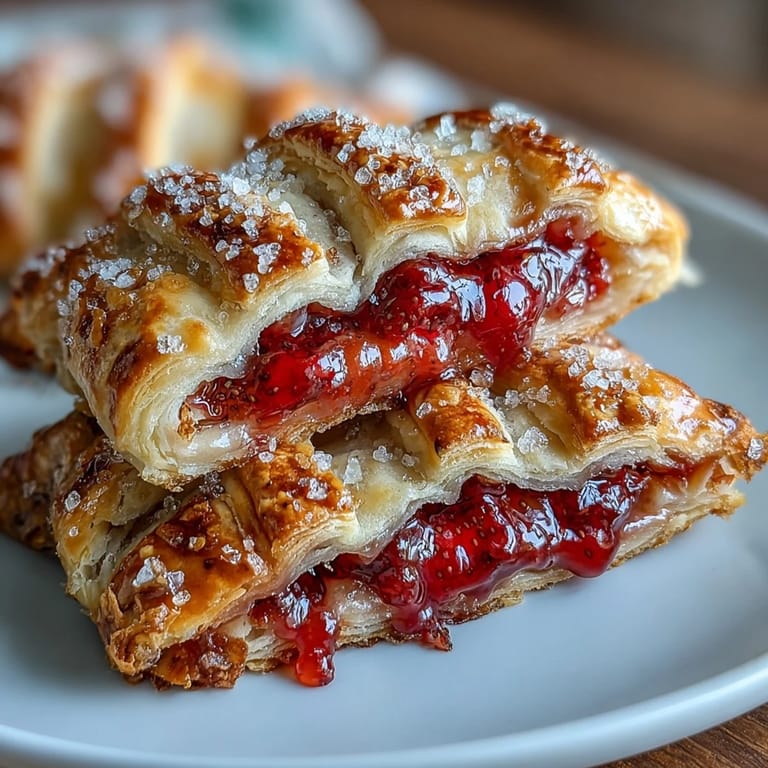
 Last summer, I showed up to a potluck with these hand pies still warm from the oven, and somehow they disappeared before anyone even sat down. My cousin kept circling back asking if there were more, and I realized then that portable desserts with actual homemade crust hit different than the usual store-bought alternatives. The lattice tops weren't even my original plan—I was struggling to figure out how to seal the edges when the weaving idea just clicked, and it turned out to be the detail everyone remembered.
I made these for my nephew's school bake sale, and watching him hand them out made me realize how much joy comes from food you can actually carry and share. One of the teachers came back asking for the recipe, which felt like the highest compliment, and I've been making them ever since.
Ingredients
- All-purpose flour (2 1/2 cups): The backbone of a flaky crust, and keeping it cold and handling it minimally is the real trick here.
- Cold unsalted butter (1 cup): Seriously, keep it in the freezer until the last moment—those little cold pockets are what creates those layers everyone raves about.
- Ice water (6–8 tbsp): Add it slowly or you'll end up with tough dough, and nobody wants that regret.
- Granulated sugar (1 tbsp for dough, 1/3 cup for filling): The dough gets just enough sweetness to complement the fruit without overpowering it.
- Salt (1 tsp for dough, pinch for filling): Sounds small but it rounds out all the flavors and makes the strawberries taste more like themselves.
- Fresh strawberries (2 cups, hulled and diced): Pick ones that are ripe but still firm—they'll hold their shape better than those mushy ones past their prime.
- Cornstarch (1 tbsp): This keeps the filling from turning into berry soup inside your pie, which I learned the hard way.
- Lemon juice (1 tsp): It brightens the strawberries and cuts through the richness of the butter crust beautifully.
- Vanilla extract (1/2 tsp): Just enough to whisper in the background without making it taste like a candle.
- Egg (1, beaten for wash): The magic ingredient that turns everything golden and glossy in the oven.
- Coarse sugar (1 tbsp for sprinkling): This is the sparkly topping that catches the light and makes people want another one immediately.
Tired of Takeout? 🥡
Get 10 meals you can make faster than delivery arrives. Seriously.
One email. No spam. Unsubscribe anytime.
Instructions
- Make the dough foundation:
- Whisk your flour, sugar, and salt together in a big bowl so it's all evenly mixed. Cut your frozen butter into small cubes and toss them into the flour—you want everything to stay as cold as possible, which is why I work quickly here.
- Build the flaky texture:
- Use a pastry blender or even just a fork to work the butter into the flour until it looks like coarse breadcrumbs with some pea-sized pieces still visible. Those little butter pockets are what make the crust flaky, so resist the urge to blend it completely smooth.
- Bring it together gently:
- Add ice water one tablespoon at a time, mixing just until the dough barely holds together—it should feel slightly shaggy and not smooth. Divide it in half, flatten each into a disk, wrap tightly, and let it chill for at least an hour while you do something else.
- Prepare the strawberry filling:
- Toss your diced strawberries with sugar, cornstarch, lemon juice, vanilla, and a pinch of salt in a bowl. Let it sit for 10 minutes so the strawberries release their juice and everything gets to know each other.
- Roll and cut:
- On a floured surface, roll out one dough disk until it's about 1/8 inch thick—think of it as thin enough to see light through but sturdy enough to move. Cut out 8 rectangles or circles about 3 by 4 inches and place them on your parchment-lined baking sheet.
- Fill with confidence:
- Spoon 2 to 3 tablespoons of strawberry filling into the center of each piece, leaving a border so it doesn't squish out the sides when you seal it. The filling should be visibly juicy and generous, not skimpy.
- Weave the lattice:
- Roll out your second dough disk and cut matching shapes, then slice each into 6 thin strips. Weave them back together in a crisscross pattern on top of the filled bottoms, pressing the edges to seal and crimping them with a fork for that classic look.
- Brush and sparkle:
- Brush the tops with your beaten egg so they get a beautiful golden shine, then sprinkle with coarse sugar for texture and visual appeal. The egg wash is what makes them look bakery-quality.
- Bake to golden perfection:
- Bake at 400°F for 22 to 25 minutes until the crust is deep golden and you can see the filling bubbling slightly at the edges. This is the smell that fills your kitchen with pure summer energy.
- Cool before you dive in:
- Let them cool on a wire rack for at least 15 minutes—I know it's hard to wait, but they'll hold together better and taste even better warm rather than straight-from-the-oven hot.
 Save to Pinterest
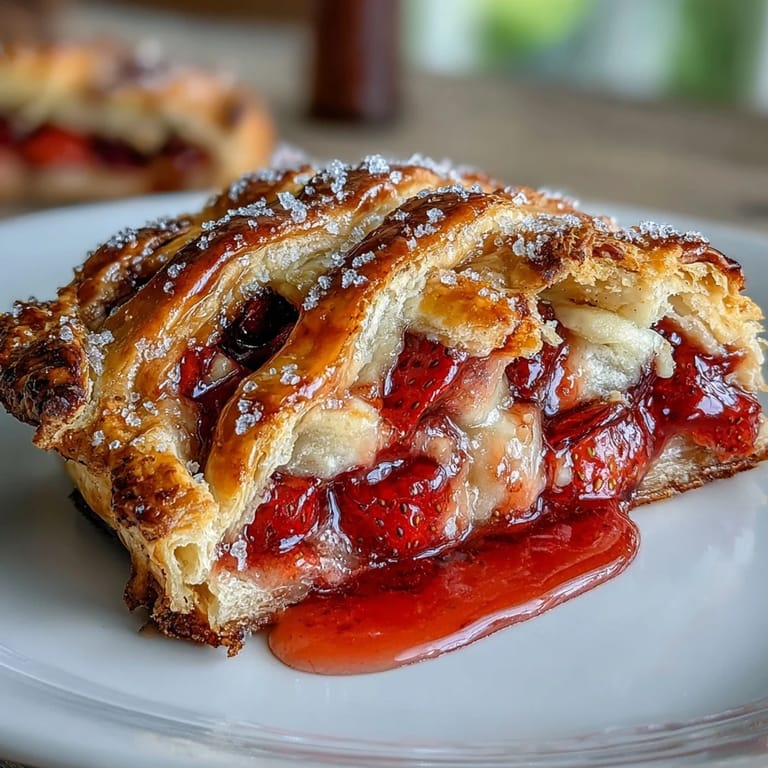
 There's something about handing someone a warm pie still studded with melted sugar crystals that feels like pure kindness. It's one of those foods that people remember not just for how it tastes, but for the moment it arrived in their day.
Why Homemade Crust Actually Matters
Store-bought dough is convenient, and I'm not judging if that's your choice, but the moment you bite into a hand pie with real homemade crust, you understand why bakers get so particular about their technique. The buttery, shatteringly flaky layers you get from keeping everything cold and handling it minimally are simply impossible to replicate with thawed pastry sheets. It's the difference between a good dessert and one someone asks you to bring to every gathering.
Strawberry Selection and Preparation
The strawberries are really the star here, so it's worth choosing ones that are deeply red and smell sweet, not the pale ones that have traveled across the country. Dice them into small, consistent pieces so they cook evenly and release their juice without turning to mush—rushing this step is tempting, but it matters. The maceration time is when all the flavors start mingling together, so even though 10 minutes seems short, it transforms the filling from just berries and sugar into something with actual complexity.
Creative Serving and Storage Ideas
These pies taste best eaten within a day or two, but you can store them in an airtight container for up to three days and warm them gently in the oven if needed. Serve them with a dollop of whipped cream or vanilla ice cream for that indulgent moment, or keep them plain for a true picnic experience where the pastry and fruit shine on their own. If you're feeling adventurous, try swapping half the strawberries for blueberries or raspberries—each berry brings its own character to the filling.
- Make them ahead and freeze unbaked, then bake straight from the freezer for about 5 minutes longer than the recipe calls for.
- The egg wash is optional if you're in a rush, but it really does make a visible difference in the final color.
- Leftover dough scraps can be mixed together, chilled, and baked with cinnamon sugar as a little cook's treat while you're working.
 Save to Pinterest
 These hand pies have become my answer to bringing something homemade to almost any summer gathering, and they never disappoint. There's something deeply satisfying about watching people choose between another plate and another one of these, and knowing you made something worth that choice.
Common Recipe Questions
- → How do I make a flaky lattice crust?
Use cold butter cut into flour until crumbly, then add ice water gradually. Roll the dough thin and weave thin strips to form a lattice pattern before baking.
- → Can I substitute other berries for strawberries?
Yes, blueberries or raspberries can be mixed with or replace strawberries for a flavorful variation.
- → What is the best way to prevent soggy bottoms?
Ensure the filling isn't too wet by macerating and draining excess juices. Baking on a parchment-lined sheet with good heat helps achieve a crisp crust.
- → How long should the dough be chilled before use?
Chill the dough for at least 1 hour wrapped in plastic to firm up butter and make rolling easier.
- → What can I serve with these handheld pies?
They pair wonderfully with whipped cream or vanilla ice cream for added richness and contrast.