 Save to Pinterest
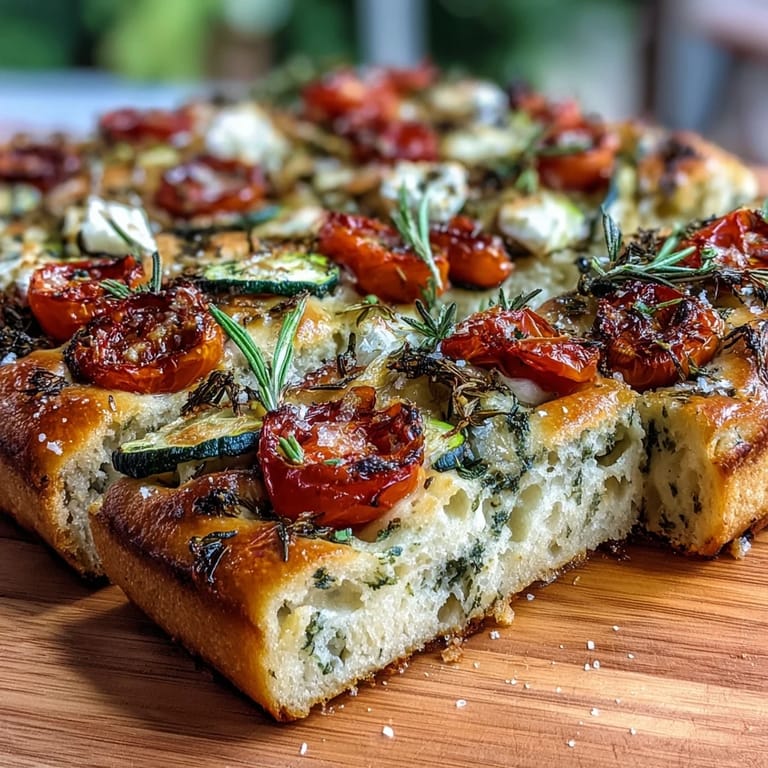
 My sister called me three weeks before her baby shower in a mild panic—she wanted the food to feel special, not just pretty. I suggested focaccia, but not the kind you'd expect. What if we turned it into edible garden art, with vegetables arranged like actual flowers blooming across the bread? She went quiet for a moment, then said, 'That's it. That's what I want.' Watching her face light up when the guests arrived to find these delicate vegetable blossoms scattered across golden, herb-scattered bread reminded me that sometimes food is really about giving people a reason to pause and smile.
I remember standing in the kitchen the morning of the shower, slicing bell peppers into rings while my niece perched on a stool asking if we were making 'fancy pizza.' The moment we arranged the first flower—red pepper rings with a cherry tomato center, surrounded by basil leaves—something clicked for her. By the time the focaccia came out of the oven and that aroma filled the house, she understood that food could be art.
Ingredients
- Bread flour: The protein content gives you that chewy, structured crumb that holds up beautifully under the weight of vegetables without getting dense.
- Instant yeast: Faster than active dry yeast, though you can swap them one-to-one if that's what you have.
- Lukewarm water: Too hot kills the yeast; too cold and it sulks and won't rise properly.
- Extra-virgin olive oil: Don't skimp here—it's flavor and richness in one ingredient, especially important since the toppings are mostly vegetables.
- Red and yellow bell peppers: Their natural sweetness balances the savory herbs, and when sliced thin, they become translucent and beautiful under the oven light.
- Cherry tomatoes: Use them halved to create flower centers or little jewels scattered throughout.
- Zucchini and carrot: A mandoline is your best friend here; it creates those delicate ribbons that look like graceful petals.
- Fresh herbs: Rosemary and thyme are sturdy enough to crisp slightly in the oven, while basil and parsley stay soft and aromatic.
- Flaky sea salt: Finishes everything with a mineral pop; regular table salt works but won't have that same texture or depth.
Tired of Takeout? 🥡
Get 10 meals you can make faster than delivery arrives. Seriously.
One email. No spam. Unsubscribe anytime.
Instructions
- Mix and hydrate your dough:
- Combine flour, yeast, sugar, and salt in a large bowl, then make a well in the center and pour in the lukewarm water and olive oil. Stir until everything comes together into a shaggy, sticky mass—this is exactly where you want to be.
- Knead until smooth:
- Work the dough on a floured surface for 8–10 minutes until it becomes elastic and starts to feel alive under your hands. If using a stand mixer, the dough hook does this work in about 5–7 minutes; you'll know it's ready when it pulls away from the bowl sides cleanly.
- Let it rise:
- Oil a bowl lightly, place the dough inside, cover with a damp cloth, and set it somewhere warm—a sunny windowsill works beautifully. You're waiting for it to roughly double in size, which usually takes 1–2 hours depending on your kitchen's warmth.
- Prep your vegetables:
- While the dough rises, slice everything thinly and arrange your pieces on a plate or cutting board so you can see your color palette clearly. This is when the creative work happens—you're essentially mapping out your garden.
- Shape and dimple:
- Preheat your oven to 220°C (425°F) and line a large baking sheet with parchment paper, drizzling it with olive oil. Punch down the dough with a satisfying fist, transfer it to the sheet, and stretch it gently to fit the pan, using your fingertips to create dimples across the entire surface—these little wells will cradle the vegetables.
- Brush and arrange:
- Brush the dough generously with olive oil, then begin placing vegetables thoughtfully. Think about it like painting: create flower heads with bell pepper rings and tomato centers, use asparagus spears or chives as stems, arrange herbs as leaves and fill in with carrot ribbons or zucchini as petals.
- Season and rest:
- Sprinkle everything with flaky sea salt and freshly ground black pepper. Let the decorated focaccia rest uncovered for 10–15 minutes while your oven finishes heating.
- Bake until golden:
- Slide the sheet into the oven and bake for 22–25 minutes, rotating halfway through for even browning. You'll know it's done when the edges are deeply golden and the bread sounds hollow when you tap it.
- Cool and serve:
- Let it rest on a wire rack for 10 minutes—this helps the bottom set properly. Slice into squares or rectangles and serve while still slightly warm, when the herb flavors are most vibrant.
 Save to Pinterest
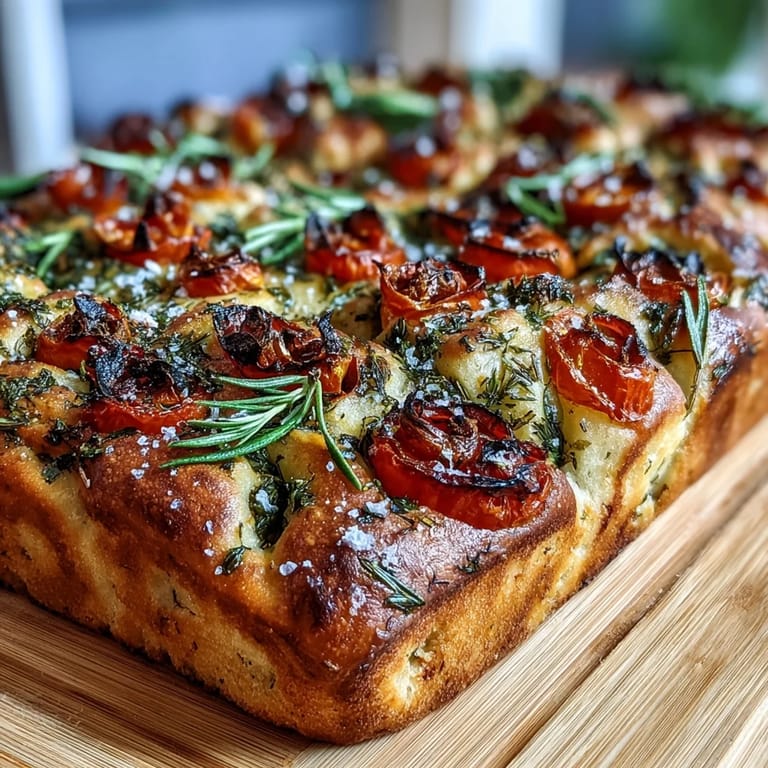
 Later that evening, after everyone had left and we were cleaning up, my sister found a photo her friend had taken: the focaccia surrounded by champagne glasses, afternoon light streaming through the window making the herbs glow. That's when I realized this bread wasn't just lunch—it was a memory someone would carry.
Building Your Floral Design
The magic of this focaccia lives in treating it like a canvas. You don't need artistic talent, just an understanding of how colors and shapes create visual rhythm. I learned this the hard way when my first attempt looked scattered and chaotic—until I stepped back and realized it actually looked like a wild field, which was exactly what I was aiming for. The key is to think in layers: start with your largest pieces (bell pepper rings), add focal points (tomato halves in the centers), then fill space with smaller elements (herbs, thinner ribbons). Stand back frequently to assess balance.
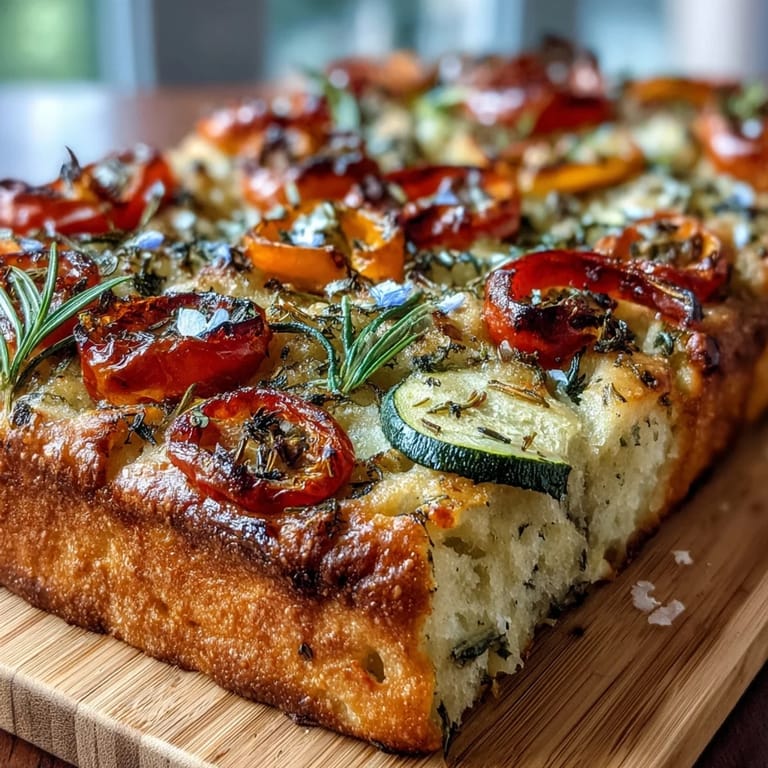
Vegetable Selection and Prep
Not every vegetable works equally well here. Thin-slicing is critical—a mandoline saves your sanity and your fingertips. Peppers and zucchini become translucent and delicate when paper-thin, while thicker cuts would overpower the bread. I've experimented with almost every vegetable imaginable: eggplant creates moody purple tones, thinly sliced radishes add peppery snap, even thin cucumber slices work if you pat them dry first. The vegetables release moisture as the bread bakes, so avoid anything too wet—pat everything with paper towels before arranging if you want a crispier bottom crust.
Timing, Storage, and Serving Suggestions
This focaccia is genuinely best the day it's made, eaten while still slightly warm, when the herbs release their full aroma and the vegetables haven't begun to soften from sitting. That said, it keeps beautifully wrapped in foil and can be revived in a 180°C (350°F) oven for about 8 minutes the next day. Serve it as is for a light lunch, alongside a crisp white wine or sparkling lemonade, or cube it for a more casual bruschetta-style appetizer. I've also seen people crumble leftovers into salads, though honestly, leftovers never seem to happen.
- Make vegetables hours ahead and keep them covered and cool until you're ready to arrange.
- If edible flowers appeal to you, source them from a specialty market or grow them yourself—never use florist flowers, which are treated with chemicals.
- The focaccia freezes beautifully for up to a month if wrapped well, though it's best thawed and eaten within a few days.
 Save to Pinterest
 Every time I make this now, I think of that moment when my niece understood that food could tell a story. That's what this focaccia does—it transforms yeast and flour and vegetables into something that feels like celebration itself.
Common Recipe Questions
- → How do I achieve a soft and fluffy focaccia texture?
Knead the dough thoroughly until smooth and elastic, then allow it to rise until doubled to develop airiness. Using lukewarm water and proper yeast activation also helps achieve a tender crumb.
- → What vegetables work best for the floral decoration?
Thinly sliced bell peppers, cherry tomatoes, zucchini ribbons, asparagus spears, and carrot strips create vibrant floral patterns that bake well and enhance appearance.
- → Can I prepare the dough in advance?
Yes, the dough can be prepared and refrigerated after the first rise for up to 24 hours, but allow it to come to room temperature before decorating and baking.
- → How do I make the focaccia crust extra crispy?
Brushing the surface generously with extra-virgin olive oil before baking and ensuring the oven is properly preheated to 220°C helps develop a golden, crisp crust.
- → Are edible flowers necessary for the decoration?
No, edible flowers are optional but add a charming touch. The vegetable arrangements provide plenty of color and texture on their own.
- → What are good beverage pairings with this bread?
Bright and refreshing drinks like sparkling lemonade or a crisp white wine complement the herbaceous and fresh vegetable flavors nicely.