 Save to Pinterest
 My daughter came home from school with a sheet of Easter craft ideas, and one caught her eye immediately—dirt cups. She insisted we make them that Saturday afternoon, and what started as a quick no-bake project turned into the most joyful kitchen mess I'd witnessed in months. Watching her carefully arrange tiny marshmallow bunnies and pastel sprinkles into cups of chocolate pudding reminded me that the best desserts aren't always about technique—sometimes they're about creating edible art that makes everyone smile. This recipe has since become our Easter tradition, requested before the decorations even come out of storage.
I'll never forget serving these at my sister's Easter brunch when she asked if I'd bought them from a bakery—the look on her face when I said we made them in 20 minutes was absolutely priceless. Her husband went back for seconds, then thirds, and suddenly everyone at the table was asking for the recipe. It's one of those dishes that feels fancier than it actually is, which is honestly the dream.
Ingredients
- Instant chocolate pudding mix (3.4 oz / 1 box): This is your foundation, so don't skip the full 2 minutes of whisking—it makes all the difference between thin and luxuriously thick.
- Cold whole milk (2 cups): The temperature matters here; cold milk helps the pudding set faster and creates the right texture.
- Oreo cookies (18 cookies, finely crushed): A food processor makes quick work of this, but honestly, the bag-and-rolling-pin method is therapeutic and works just as well.
- Whipped topping (1 cup): Cool Whip is convenient, but homemade whipped cream takes these from fun to genuinely luxurious if you have the extra 5 minutes.
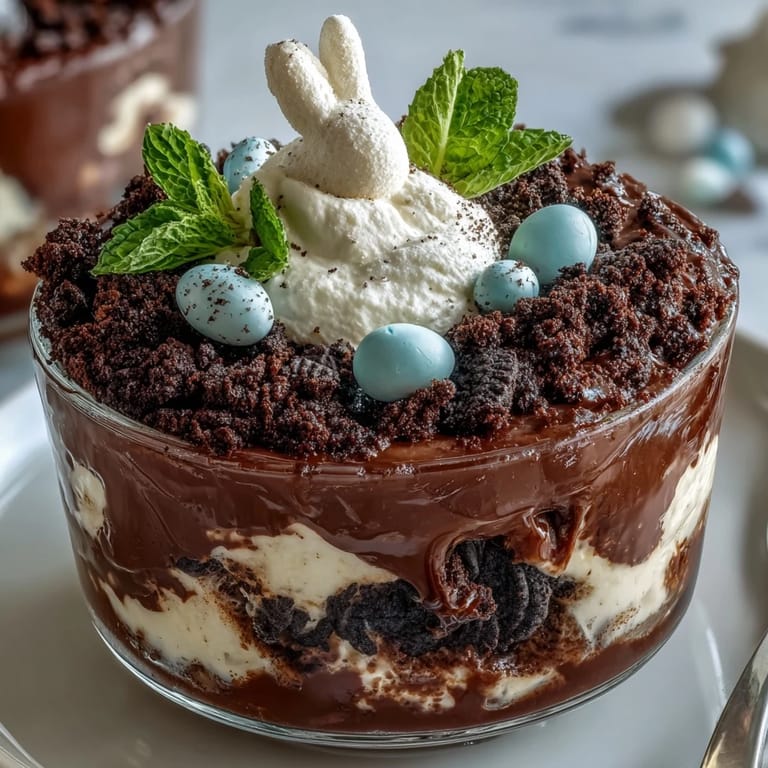
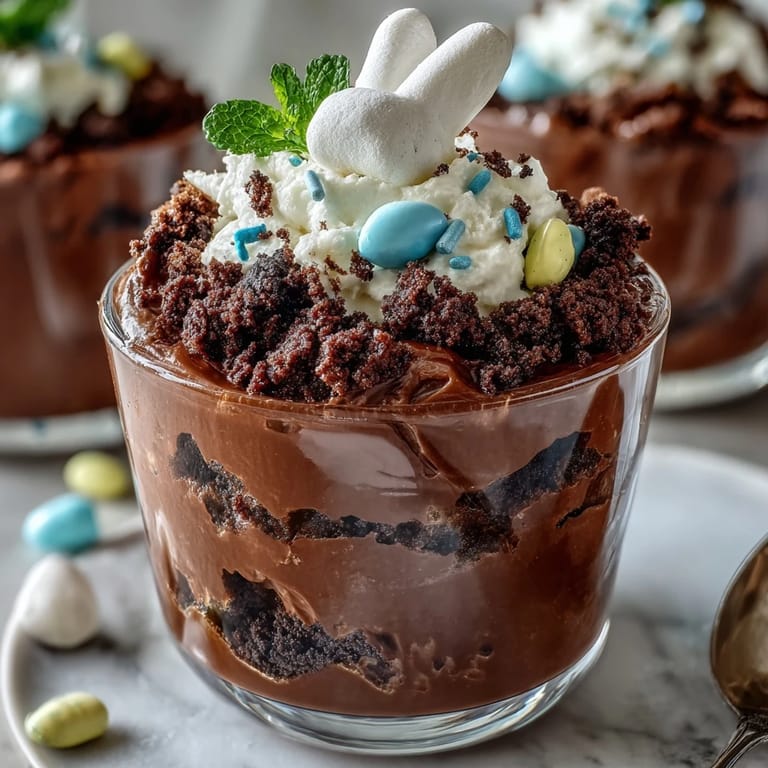
- Marshmallow bunny candies or chocolate bunnies (6-12): These are the stars of the show, so pick ones you actually like eating since you'll be tempted while decorating.
- Pastel-colored sprinkles (1/4 cup): They look beautiful and taste like pure nostalgia, though they do soften slightly if the cups sit too long.
- Mini candy eggs (1/3 cup, optional): These add a charming Easter element and a different texture that keeps things interesting.
- Fresh mint sprigs (6 small sprigs, optional): A real touch of spring that makes the whole thing feel more intentional than it actually is.
Tired of Takeout? 🥡
Get 10 meals you can make faster than delivery arrives. Seriously.
One email. No spam. Unsubscribe anytime.
Instructions
- Whisk the pudding into silky perfection:
- Pour the pudding mix and cold milk into a bowl and whisk steadily for the full 2 minutes—this is where the magic happens, transforming powder into something rich and spoonable. Let it rest for 5 minutes undisturbed while you move on to the next step.
- Crush those cookies into dirt:
- Whether you use a food processor or the old-fashioned rolling pin method, aim for a mixture of fine crumbs and slightly larger chunks—uniformity is overrated and texture is everything. If using the bag method, take out your day on those Oreos; it's oddly satisfying.
- Layer the dirt at the bottom:
- Spoon exactly 2 tablespoons of crushed Oreos into each clear cup, pressing gently so it creates a solid base layer. This is when you'll start to see the magic of clear cups—the layers are half the appeal here.
- Add the chocolate foundation:
- Divide the pudding evenly among the cups, spooning it carefully over the cookie layer. Watch how it nestles into the crumbs slightly—that's the moment you'll understand why this works.
- Create the middle dirt layer:
- Top each pudding layer with another 2 tablespoons of Oreo crumbs, creating that convincing dirt effect that makes everyone do a double-take. Don't worry about perfection; a little irregularity actually makes it more authentic looking.
- Add the cloud of cream:
- Dollop or pipe a generous spoonful of whipped topping into the center of each cup—this is your contrast layer and your blank canvas for decoration. If you're piping, a simple swirl looks more polished than you'd expect.
- Decorate with spring joy:
- Arrange bunny candies, sprinkles, mini eggs, and mint sprigs on top of each cup with the same care you'd give to actual gardening. This is where personality comes in; let yours show.
- Serve or chill:
- These are best enjoyed immediately while the layers are distinct, though they hold up in the refrigerator for several hours if you're not serving right away.
 Save to Pinterest
 There was a moment during last Easter when my nephew, who's usually skeptical about anything homemade, took his first bite and his entire face lit up with surprise and delight. That's when I realized these dirt cups are more than just dessert—they're an edible permission slip to be playful, to embrace the whimsical, and to find joy in something as simple as chocolate, cookies, and candy bunnies.
Why These Are Better Than Store-Bought
Store-bought versions often taste like they've been sitting under fluorescent lights, but homemade versions still have that fresh pudding flavor and the Oreos maintain some structural integrity instead of turning into mush. You also get to control the sweetness level and choose quality ingredients without additives, which honestly tastes noticeably different when you do it side by side.
Customizing for Your Crowd
The beauty of this recipe is that it's endlessly adaptable without losing its charm or ease. Dairy-free milk works beautifully with the pudding mix, gluten-free cookies can replace Oreos seamlessly, and you can swap out the decorations based on what you have on hand or what your family actually enjoys eating. I've made versions with crushed graham crackers mixed into the Oreo layer, used butterscotch pudding for fall parties, and even gone chocolate-on-chocolate with dark pudding and crushed chocolate wafers.
Pro Tips & Storage
These are designed to be assembled close to serving time for optimal texture contrast, though you can prepare the pudding and crush the cookies hours in advance if you're planning ahead. The whipped topping helps insulate the pudding layer, keeping it from getting too hard if you need to refrigerate, and most batches hold beautifully for up to 24 hours. If you're making these for a crowd, assembly line style is weirdly fun and cuts the time in half.
- Chill serving cups for 10 minutes before layering if you want the pudding to set even faster and more firmly.
- Use a piping bag with a plain round tip for the whipped topping to make the presentation look intentional and polished.
- Double-check your candy ingredients if anyone has nut allergies since some decorative candies process their items in shared facilities.
 Save to Pinterest
 These little cups have somehow become my shorthand for springtime and celebration, and I'm certain they'll become yours too. Make them once and you'll understand why they've become such a beloved Easter tradition in our house.
Common Recipe Questions
- → What type of pudding is used?
Instant chocolate pudding mix combined with cold whole milk creates a smooth, creamy base for the cups.
- → Can I substitute the Oreo cookies?
Yes, gluten-free sandwich cookies work as a good alternative for those with dietary restrictions.
- → How should I crush the cookies?
Use a food processor or place cookies in a zip-top bag and crush them gently with a rolling pin until finely ground.
- → Are there options for decorations?
Yes, use marshmallow or chocolate bunny candies, pastel sprinkles, mini candy eggs, and mint sprigs to create a festive look.
- → How long can these cups be stored?
Best enjoyed within 24 hours to maintain texture and freshness. Store refrigerated if not serving immediately.