Save to Pinterest
 If you ever walked into a kitchen humming with laughter and the faint fizz of champagne, that's the kind of energy I channel whenever I bake this Rosé Velvet Cake. The first time I spotted a rosy-pink cake at a friend's bridal shower, I was struck by both its elegance and whimsy, and couldn't wait to try my hand at one. It wasn't the classic red velvet, but something more delicate – an airy sponge kissed with real rosé. The intoxicating aroma as it bakes is reason enough to smile. I always find myself sneaking a taste of the batter just to see if the floral notes of wine come through.
One spring afternoon, pressed for time before a bridal shower, I rushed a batch of this cake while listening to a playlist of 90s love songs. My kitchen quickly filled with the perfume of baking rosé, and even as I scrambled to find my offset spatula, I knew this cake was going to steal the spotlight at the party. There’s something magical about unveiling a cake so pretty it gets its own round of applause. Later, I caught guests sneaking slices for the road – and that’s how I knew I’d landed on something memorable.
Ingredients
- All-purpose flour: I always sift it to avoid lumps and give the cake a finer crumb; measure carefully for consistent results.
- Granulated sugar: Use superfine if you can—it dissolves quickly and gives the sponge its tender texture.
- Baking soda: Just the right amount helps the cake rise perfectly without a telltale aftertaste.
- Fine salt: Never skip this—it sharpens each flavor so the rosé sings.
- Cocoa powder (unsweetened): A touch adds depth and keeps the color bright instead of too red.
- Vegetable oil: This is the secret for a moist and luscious crumb that stays soft for days.
- Eggs (room temperature): Let them sit out ahead of time for best texture and volume in the batter.
- Buttermilk (room temperature): The tang keeps everything light and counters the sweetness beautifully.
- Rosé wine: Choose a dry or sparkling rosé for subtle notes—never use a sweet wine or it’ll overpower the cake.
- Vanilla extract: A good quality vanilla balances out the floral and bright flavors.
- White vinegar: A splash sharpens the texture and helps react with soda for a lighter crumb.
- Pink or rose gel food coloring: Add a little at a time until you reach the perfect blush—liquid coloring makes the batter too thin.
- Unsalted butter (for buttercream): Softened until creamy, it whips up fluffiest for icing.
- Powdered sugar (sifted): Sifting is non-negotiable for smooth, satiny buttercream.
- Heavy cream: Just a splash melts into the chocolate for a glossy drip.
- White chocolate chips: Melt gently—they scorch fast; I use a glass bowl and keep close watch.
- Edible gold luster dust: The magic that makes your cake sparkle; double-check it’s labeled edible.
- Vodka or clear lemon extract: For mixing with luster dust to make a quick-drying edible paint.
- Pinch of salt: A tiny bit in the buttercream keeps it from tasting too sweet.
Tired of Takeout? 🥡
Get 10 meals you can make faster than delivery arrives. Seriously.
One email. No spam. Unsubscribe anytime.
Instructions
- Prepare cake pans:
- Grease and line three 8-inch pans with parchment, letting the paper hang slightly over the sides for easy removal. The sound of parchment crunching always makes me hopeful for a clean release.
- Combine dry ingredients:
- Sift flour, sugar, baking soda, salt, and cocoa into a large bowl; I like to run my fingers through the mix to catch any stubborn lumps.
- Mix wet ingredients:
- In another bowl, whisk oil, eggs, buttermilk, rosé, vanilla, and vinegar until smooth; I always pause for a sniff—that mingled aroma is reason alone to bake this cake.
- Create the batter:
- Add wet ingredients to dry and stir just until combined, then swirl in food coloring little by little for a dreamy blush-pink batter that almost glows.
- Bake:
- Divide the batter evenly and bake for 30-35 minutes; you’ll know it’s done when a toothpick comes out clean and the kitchen smells sweet and floral.
- Cool the cakes:
- Let cakes cool in pans for 10 minutes, then invert onto a wire rack; I always peel the parchment off slowly, resisting the urge to snag a warm crumb.
- Whip up the buttercream:
- Beat butter until pale and fluffy, then add powdered sugar gradually, whisking after each cup—don’t rush or you’ll end up coated in sugar.
- Finish the buttercream:
- Mix in rosé, vanilla, and salt, whipping for a couple minutes until billowy—taste and adjust if you want a bolder rosé note.
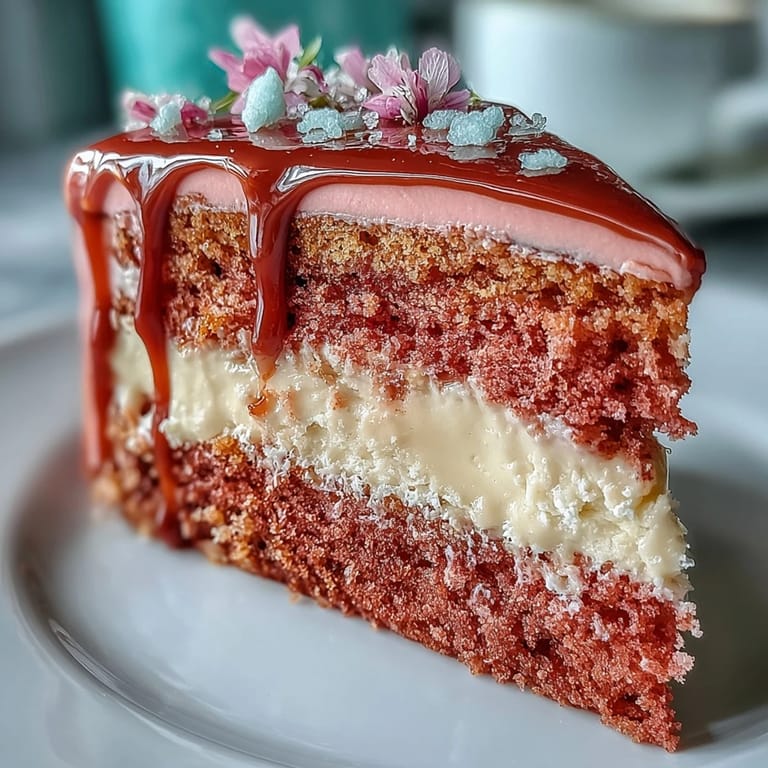
- Assemble and crumb coat:
- Layer cake with buttercream, smoothing each tier as you go, then cover the whole cake lightly and chill, letting the cake firm up before the final coat.
- Final buttercream coat:
- Spread the last layer of buttercream evenly—using an offset spatula makes it feel almost meditative.
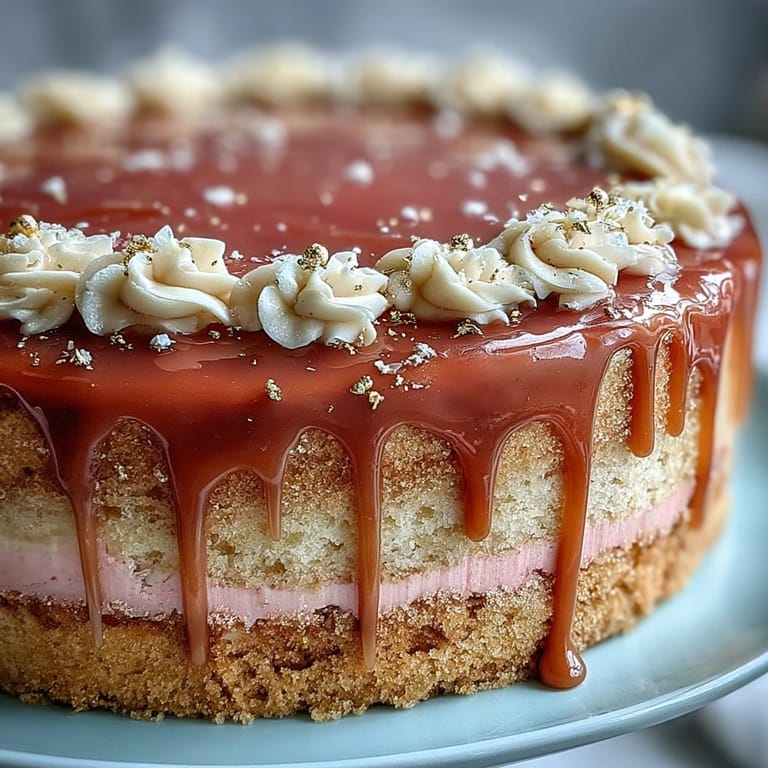
- Make the gold drip:
- Melt white chocolate with cream, then cool a bit; drip it along the cake’s top edge and let it cascade down the sides.
- Paint and decorate:
- Mix gold luster dust with vodka or lemon extract, and paint each drip gold once set; finish with more gold, rose petals, or berries for a showstopping look.
 Save to Pinterest
 Midway through the last shower I made this for, I caught two cousins quietly scheming in the kitchen, plotting to snatch the golden edge pieces before anyone else. It hit me then: cakes aren’t just for looks—they’re invitations to gather, laugh, and indulge in a bit of sparkle together. That moment gave this cake its own little legend in my family. While I may fuss over the perfect drip, it’s those sneaky dessert whispers I remember best. Even now, gold dust smudges on my fingertips bring a grin.
Making That Gold Drip Pop
My first attempt at a metallic drip was shaky at best, but I learned that temperature matters more than fancy tools. Let the white chocolate cool just enough—warm but not hot—so it won’t run all the way to the plate. The process of painting on each golden drip, brush trembling in hand, became oddly satisfying. Swirling the luster paint to the right consistency took practice and a few test batches (yes, I ate them all). Each cake gets easier, and every drip ends up a little different, which secretly adds to the charm.
Rosé Picks and Pairings
Not all rosés are created equal for baking—a dry or sparkling variety keeps the sponge light and lets the vanilla and cocoa peek through. Once, in a pinch, I tried a blush that was far too sweet, and it overpowered the cake completely. When pairing, a chilled glass of fresh rosé alongside a slice brings out the magic in both. And if you want to highlight those floral notes, a garnish of fresh rose petals is worth the extra flourish. Don’t be afraid to customize with seasonal berries or edible blooms for a personalized touch.
Common Mistakes and Cake-Saving Fixes
Through trial and error, I’ve learned cakes are forgiving—if a layer domes, just slice it off (snack for the chef). If the buttercream seems too soft, a quick chill firms it right up. Should the gold drip wander too far down, simply stop and let it set, then patch it from above—imperfections tend to disappear once the shimmer’s on. For streak-free gold, use a new brush each time. And if your cake feels a bit dry after the fridge, a half hour at room temperature brings back its softness.
- If crumbs sneak into your buttercream, just add a thicker top coat.
- Use a lazy Susan for smooth spins as you ice the cake.
- Edible flowers are the easiest upgrade for last-minute wow factor.
 Save to Pinterest
 Most of all, don’t stress the little things—every gold-tipped slice is a tiny celebration. Handing someone a piece feels like gifting them a bit of sparkle and joy.
Common Recipe Questions
- → Can I substitute rosé with a non-alcoholic liquid?
Yes. Use sparkling grape juice, diluted cranberry juice, or a mix of apple juice and lemon for a fruity note. Reduce other liquids slightly to keep the batter consistency right.
- → How do I achieve an even rosy pink color?
Use gel or paste food coloring for concentrated pigment and add a little at a time. Mix just until uniform to avoid overworking the batter and affecting rise.
- → How can I prevent the layers from sinking?
Measure ingredients precisely, avoid overmixing, and bake until a tester comes out clean. Let layers cool 10 minutes in their pans before removing, then cool completely on a rack.
- → What’s the best way to get a smooth buttercream finish?
Apply a thin crumb coat and chill for 20 minutes, then use an offset spatula with long, even strokes. Thin the buttercream with a splash of rosé if it’s too stiff for smoothing.
- → How do I make a glossy, stable gold drip?
Make a white chocolate ganache by melting chips with cream, cool slightly so it’s pourable but not runny, pipe or spoon along edges, then paint with edible gold luster mixed with a tiny amount of vodka or clear lemon extract.
- → How should I store and serve the finished cake?
Keep chilled up to 24 hours and bring to room temperature before serving for best texture. Add fresh petals or berries just before display to keep them vibrant.